Guide To Observing the Sky
| Site: | The Turner Science Courses |
| Course: | The Turner Science Courses |
| Book: | Guide To Observing the Sky |
| Printed by: | |
| Date: | Wednesday, 24 June 2026, 2:19 PM |
1. Learning the Night Sky
How to navigate the night sky
1.1. First Constellations
Ancient man looked at the patterns of visible stars and imagined patterns representing a variety of animals, heroes, and objects. These constellations were somewhat different for each culture, but have become standardized by more modern astronomers into 88 constellations covering the entire sky. Although many of the constellations can be challenging to find and identify, the beginning observer should learn how to locate the brighter constellations. There are several reasons for acquiring this skill, but the main one for the amateur astronomer is to be able to eventually locate stars and objects of interest from catalogs (or software) that indicate their position by indicating the constellation in which it lies, and stars within the constellation that can be used to guide the observer to the object.The visibility of the various constellations changes over the course of the year, as the Earth orbits the sun resulting in the night-facing side of Earth being pointed in different directions toward the distant stars. There are a set of constellations, however, that will always be visible in the night sky surrounding the points at which a projection of Earth's axis of rotation intersects the sky. Here in the northern hemisphere, the projection of Earth's north pole intersects the sky near Polaris, the North Star. As the night progresses, all objects in the night sky will seem to rotate about Polaris from east to west, or counterclockwise when facing north. Locating Polaris in the sky is our first goal.
The easiest way to find Polaris (other than using a phone app - please refrain from that, as you will learn very little that way), is to know your latitude and have a compass with you (I'll be a bit inconsistent here and remind you that your phone has a compass app in it, so you don't need a physical compass). Using the compass, face roughly north. Hold your hand out at arms-length in front of you. Spreading your hand out, the distance from your thumb to pinky is roughly 20 degrees in the sky, the width of your fist is about 10 degrees, and each finger is about 2 degrees. Using this built-in sky ruler, move up from the horizon until you are looking roughly at the angle equal to your latitude. Near that location in the sky you should find a moderately bright star. Bingo, that's Polaris.
An alternative way to find Polaris assumes you know how to find Ursa Major, or "The Big Dipper". Note that these are not actually the same thing - "The Big Dipper" is formed from the brighter stars of the larger constellation Ursa Major. If you do know what the "Big Dipper" looks like, and if you can locate it, draw a line from the two stars at the end of the "bowl" of the Dipper north, and that line will come close to Polaris.
Polaris, being near the point in the sky about which the other stars appear to circle during the night, is always in the same location for a given observing site. But to find the other constellations, the time and the month of the year matter, because of this apparent circling of the stars. One way to go about finding constellations is to consult a star chart for the date and time you are planning to observe. Lots of free options are available, but for this discussion I'm going to assume you are roughing it and not using a chart.
I'm going to assume you are observing in the evening. Our next target is Ursa Minor, or "The Little Dipper". Polaris is at the tail of the handle of this "Dipper". In the spring, look to the right of Polaris to find the handle and dipper, the pattern is shown below:
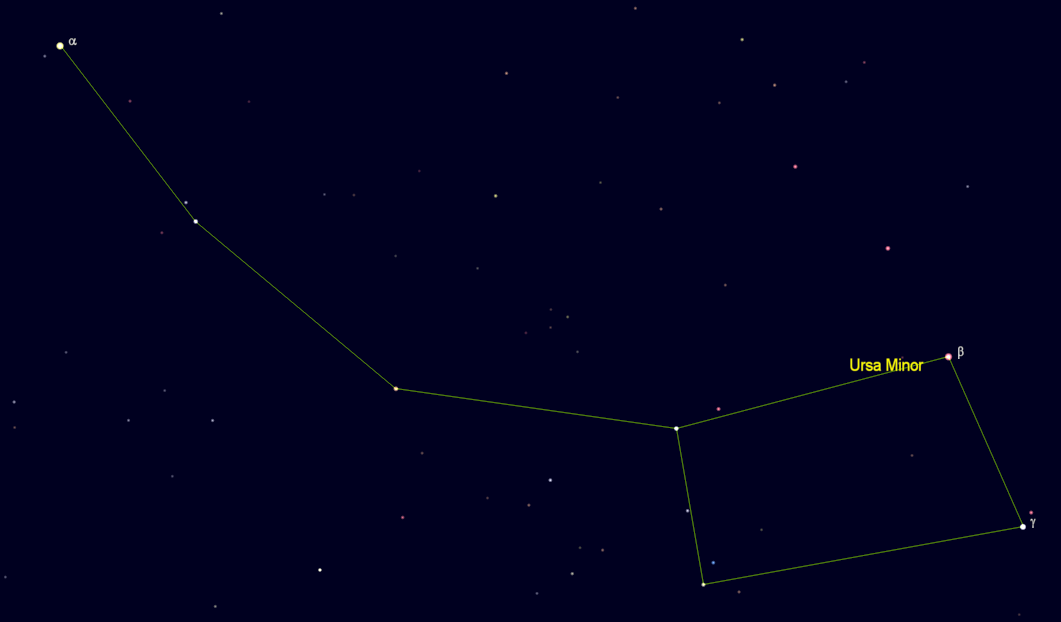
As the year progresses, at any fixed time of night, the constellation will rotate in the sky counterclockwise. So, by June, Ursa Minor will be "above" Polaris, in September, to the left of Polaris, and in December, "below" Polaris (and if you have trees in your way you might have difficulty finding it depending on the season).
Next, let's try to find Ursa Major, the "Big Dipper", assuming you didn't use it to find Polaris. The Big Dipper part of Ursa Major looks approximately like a bigger version of the Little Dipper of Ursa Minor. From the "Little Dipper", travel counterclockwise around Polaris, tracing the arc of the handle of the "Little Dipper", and moving farther out away from Polaris. In March, the Big Dipper is to the upper right of Polaris, in June to the upper left, September, lower left, and December lower right.
The last of the "first constellations" to find is (the queen) Cassiopeia. This constellation's brightest stars form a W or M depending on the season, and will be opposite Ursa Minor on the other side of Polaris. So, in March, to the left of Polaris, June below Polaris (and looking like a W), September to the right of Polaris, and December above Polaris (looking like an M). There is a sixth star in the brighter pattern of Cassiopeia that completes a "box" on the right side of the W or the left side of the M with the central star, as shown below. One way of interpreting the shape of Cassiopeia is as a chair or throne for the queen, that box being the seat and legs of the chair. Again, trees, especially in the summer, can make Cassiopeia difficult to find as it will be close to the horizon.

2. Instruments
Devices used to observe
2.1. The Human Eye
Here we will discuss the most important piece of equipment an astronomer owns - their two eyes.
2.2. Binoculars
The least expensive and easiest instrument to use for increasing the number of objects visible in the night sky are the binoculars.
2.3. Guide to Buying a First Telescope
as before